Learn to make challah bread for Shabbat with this step-by-step recipe, and discover the spiritual significance of this fluffy, aromatic, braided Jewish bread. Kosher, Parve.
Prep time: PT240M
Cook time: PT45M
Total time: PT105M
Rating
4.83 stars (304 reviews)
Keywords
challah
Ingredients
1 1/2 cups lukewarm water, divided
1 packet active dry yeast
1 teaspoon sugar
1 large egg
3 large egg yolks
1/3 cup honey
2 tbsp avocado oil ((I prefer avocado oil for flavor and health reasons - you may substitute sunflower oil or canola oil))
2 teaspoons salt
4 1/2-6 cups all purpose flour
1 large egg
1 tablespoon cold water
1/2 teaspoon salt
Raisins, chocolate chips (1 ½ cups of either)
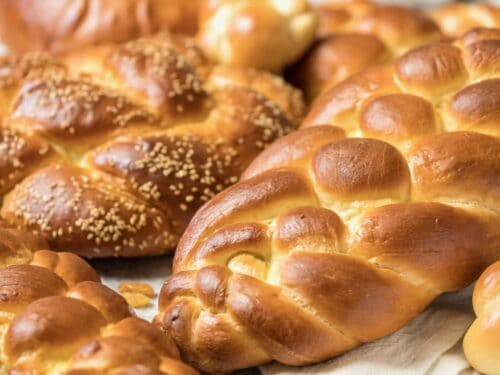
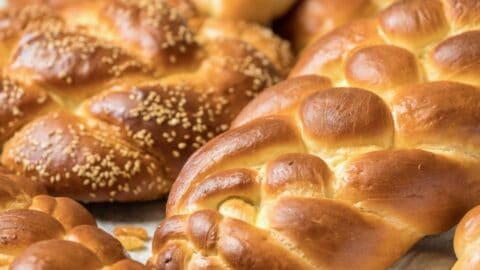
Sesame seeds, poppy seeds, kosher salt
Categories
Side Dish
Cuisine
jewish
Steps
Pour ¼ cup of the lukewarm water (about 110 degrees) into a large mixing bowl. Add 1 packet of active dry yeast and 1 tsp of sugar to the bowl, stir to dissolve. Wait 10 minutes. The yeast should have activated, meaning it will look expanded and foamy. If it doesn’t, your yeast may have expired, which means your bread won’t rise—go buy some fresh yeast! This step Is called "proofing" the yeast - if you're using instant yeast you can skip this step and simply add the yeast to your dry ingredients. If you're using fresh yeast (or compressed or cake yeast), simply stir it into the lukewarm water to dissolve, then add the remaining wet ingredients - no need to wait for proofing.
Once your yeast has activated, add remaining 1 ¼ cup lukewarm water to the bowl along with the egg, egg yolks, honey, oil, and salt. Use a whisk to thoroughly blend the ingredients together.
Begin adding the flour to the bowl by half-cupfuls, stirring with a large spoon each time flour is added. When mixture becomes too thick to stir, use your hands to knead.Continue to add flour and knead the dough until it’s smooth, elastic, and not sticky. The amount of flour you will need to achieve this texture varies—only add flour until the dough feels pliable and “right.” If you plan to add raisins or chocolate chips to the challah, incorporate into the dough as you knead.
Place a saucepan full of water on the stove to boil.Meanwhile, remove the dough from your mixing bowl and wash out the bowl. Grease the bowl with oil. Push the dough back into the bottom of the bowl, then flip it over so that both sides are slightly moistened by the oil.
Cover the bowl with a clean, damp kitchen towel. Place the bowl of dough on the middle rack of your oven. Take the saucepan full of boiling water and place it below the rack where your dough sits. Close the oven, but do not turn it on. The pan of hot water will create a warm, moist environment for your dough to rise. Let the dough rise for 1 hour, or until the dough doubles in size. This may take longer depending on a number of things, including weather conditions... be patient! It's important to let the dough rise for best results.
Take the dough bowl out and punch it down several times to remove air pockets.
Place it back inside the oven and let it rise for 1 hour longer, or until the dough doubles in size.
Take the dough out of the oven. Flour a smooth surface like a cutting board. Punch the dough down into the bowl a few times, then turn the dough out onto the floured surface. Knead for a few minutes, adding flour as needed to keep the dough from feeling sticky.
Now your dough is ready to braid. If you plan to separate and bless the challah, do it prior to braiding. Click here to learn how to braid challah.After you’ve braided your challah, place it on a cookie sheet lined with parchment paper (this will catch any spills from your egg wash and keep your challah from sticking to the cookie sheet).Note: I usually only put a single challah braid on a cookie sheet, since they tend to expand a lot when baking.
Prepare your egg wash by beating the egg, salt and water till smooth. Use a pastry brush to brush a thin layer of the mixture onto the visible surface of your challah. If you're adding sesame seeds or some other topping, sprinkle it on the damp dough now - the egg wash helps it stick. Reserve the leftover egg wash.
Let the braid rise 30 to 45 minutes longer. You’ll know the dough is ready to bake when you press your finger into the dough and the indentation stays, rather than bouncing back.Heat oven to 350 degrees F. The challah needs to bake for about 40 minutes total, but to get the best result the baking should be done in stages. First, set your timer to 20 minutes and put your challah in the oven.
After 20 minutes, take the challah out of the oven and coat the center of the braid with another thin layer of egg wash. This area tends to expand during baking, exposing areas that will turn white unless they are coated with egg wash.Turn the tray around, so the opposite side is facing front, and put the tray back into the oven. Turning the tray helps your challah brown evenly—the back of the oven is usually hotter than the front.
The challah will need to bake for about 20 minutes longer. For this last part of the baking process, keep an eye on your challah—it may be browning faster than it’s baking. Once the challah is browned to your liking, take the tray out and tent it with foil, then place it back in the oven. Remove the foil for the last 2 minutes of baking time.Take the challah out of the oven. At this point your house should smell delicious. You can test the bread for doneness by turning it over and tapping on the bottom of the loaf—if it makes a hollow sound, it’s done. Let challah cool on the baking sheet or a wire cooling rack before serving.
Nutitrion
Serving Size: 1 serving
Calories: 124 kcal
Carbohydrates: 22 g
Protein: 3 g
Fat: 2 g
Cholesterol: 38 mg
Sodium: 250 mg
Sugar: 4 g
Reviews
Tanya on 2025-05-17 (5 stars): This is the recipe I use every time! I usually half it and make 2 mini loaves. In order to do this, I use 2 eggs, and save a bit of egg white for the wash. Apply egg wash before baking, midway, and (very thinly) immediately after for best shine. I also sub out 1/3 of the dough for whole wheat and it behaves fine.
Rod Ferris on 2025-05-02 (5 stars): I’ve been baking this challah recipe for nigh on 10 years now. It’s the only one I find I can work with!! You have a fan base with my closest family and friends. Christmas or Easter “ Make you Challah!”, goes up the cry! I have converted it to metric and figure the percentages and it’s a no fail recipe consistent and tender. If make 2 700g loaves and the dough works a treat! Until I found this recipe it’d tried so many others and I found that they didn’t work well with our Canadian All Purpose flour. They were always too dry, and tasteless. The eggs are the charm! I should say the egg yolks. Last May (a year has past, we were sending my God daughter off the the missionaries of Charity (Mother Teresa’s community) YOUR CHALLAH was requested. I made the whole batch into one loaf. It was a yard long!! It was just a few hours fresh and it went every crumb in the two hours we celebrated our darlings adventure! Thank you Tori for this gift!
Jodi on 2025-04-23 (5 stars): This is THE only challah recipe you will need! I'm a professional private chef, and make this challah on a weekly basis for my client's Shabat dinner. I love making different braid designs, and because the recipe makes one generous loaf or two nice size loaves, it's fun to experiment with different sizes. If you follow the recipe precisely, it will turn out perfectly.
Dalia on 2024-11-19 (5 stars): It was my first time making this challah recipe, and it came out perfectly! Over the years I've tried other challah recipes and failed. I don't have much experience baking, but I wanted so badly to be able to have a good homemade challah. I followed this recipe exactly, and I'm so impressed with how it came out. The house smelled incredible. It had the perfect nostalgic taste and texture. Keeping it near boiled water while rising really did the trick. A lot of times I find that my bread doesn't rise properly, so I'm going to use this technique for other recipes. Can't wait to make this again! Now I just need to work on my braiding skills.
Tracy on 2024-10-04 (5 stars): BEST.CHALLAH.EVER! I consider myself a 'decent' cook but have always shied away from breads-just thought they were too difficult to get right. My daughter recently persuaded me to try working with sourdough and I have found it not only fun but very satisfying to see the dough take shape. Being I live very remotely, (and there is nowhere for me to buy traditional challah) I wanted to have one for the holiday. After viewing many recipes, I thought yours looked best...and it was! Your recipe was very easy to follow (especially for someone new to baking breads) and the pictures and braiding tutorial were of great help. The end result was not only beautiful but extremely tasty, and the perfect pairing with my pot roast. I judge recipes by whether they are 'company worthy' and this one definitely is! Thank you...
Wendy shenker on 2024-10-02 (5 stars): Thank you Tori, I've always been scared to make Chalkah. I followed your recipe exactly and I have 2 of the most beautiful challahs.